Animation
Frames and keyframes
A keyframe is a frame where the artwork changes. Ordinary frames after it hold that artwork on screen. Frame-by-frame animation is a keyframe on every frame or two; tweened animation is keyframes further apart with Phoenix filling in between.
Insert and remove frames
| Command | Shortcut | Does |
|---|---|---|
| Frame | F5 | Adds frames, extending how long the current artwork holds |
| Keyframe | F6 | Makes a keyframe that starts as a copy of the previous one |
| Blank Keyframe | F7 | Makes an empty keyframe, to draw the next drawing from scratch |
| Remove Frames | Shift+F5 | Deletes the selected frames, closing the gap |
| Clear Keyframe | Shift+F6 | Turns a keyframe back into an ordinary frame |
| Clear Frames | Alt+Backspace | Empties the selected frames, leaving the frames after them where they are |
Frame, Keyframe and Blank Keyframe are in ; the others are in . All but Clear Frames are also on the menu you get by right-clicking frames. Each acts on every selected frame, or on the playhead's frame of the current layer.
You don't always need F6. If you draw on a frame of a layer that is only holding an earlier keyframe, Phoenix makes the keyframe for you.
Select frames
- Click a cell to select it. This also moves the playhead there and makes that layer current.
- Drag across cells, including across several layers, to select a block.
- Shift-click to extend the selection.
- Ctrl-click to add single frames anywhere, on any layer, or take them out again. Frame commands such as F6 or Clear Keyframe then act on each of them.
- (Ctrl+Alt+A) selects every frame of every layer.
To select whole spans between keyframes with one click, turn on Span Based Selection in the frame view menu.
Move, copy and stretch frames
| Do this | To |
|---|---|
| Drag a selected block | Move it to another frame or layer |
| Alt when you drop | Copy the block instead of moving it |
| Click a keyframe, then drag it | Move just that keyframe; hold Alt when you drop to copy it |
| Ctrl-drag the end of a span | Lengthen or shorten the span |
Frame commands
- Cut, Copy, Paste Frames
- Ctrl+Alt+X, C and V. Paste Frames inserts, pushing later frames along.
- Paste and Overwrite Frames
- Pastes over the frames already there instead of inserting.
- Reverse Frames
- Plays the selected frames backward.
- Convert to Frame-by-Frame Animation
- Turns a tween into a keyframe on every frame, ready to adjust by hand.
- Copy Motion, Paste Motion
- Copies a motion tween's movement and gives it to another symbol instance or text block, alone on its keyframe, as a motion tween of its own starting from where that object is.
- Remove Tween
- Removes the classic, shape or motion tween from the selected spans, leaving their keyframes. A span that had a motion tween holds its object where the motion started.
- Distribute to Keyframes
- In . Select several objects on one frame and each goes on a keyframe of its own, one after another: the bottom one stays, the next goes on the frame after, and so on.
Edit Multiple Frames
Turn on to see the keyframes within the onion skin markers in full, not faded, and to select and change their artwork together: drag a marquee over a whole run of drawings and move them all at once, for example. Hidden and locked layers are left out. Set the range by dragging the onion skin markers in the ruler.
Frame labels
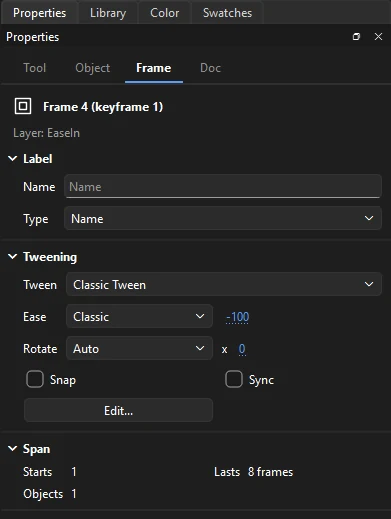
Click a keyframe and use the Label section of the Frame tab to name it. The Type list makes it a Name (a marker scripts can jump to), a Comment (a note for yourself), or an Anchor. Labels show in the timeline, which makes long scenes easier to find your way around.
Playback
| Command | Shortcut |
|---|---|
| Play / Stop | Enter |
| Step forward one frame | . |
| Step backward one frame | , |
| Next keyframe | Alt+. |
| Previous keyframe | Alt+, |
| Rewind to the first frame | Shift+, |
| Go to the last frame | Shift+. |
| Loop playback | Alt+Shift+L |
| Enable simple frame actions | Ctrl+Alt+F |
These are in the Control menu, and the timeline header has buttons for the first frame, stepping, play, onion skin and loop. They work when the stage or timeline has focus, so they never interfere with typing in a text box or panel.
Playback runs at the document's frame rate. If a frame takes too long to draw, Phoenix skips ahead to stay in time, so what you see matches the real speed. Sounds play along, unless you turn on (Ctrl+Alt+M).
In a document with several scenes, playback runs on from the last frame of one scene into the first of the next, as the published movie does, and stops at the end of the last. With Loop Playback on over the whole scene, it goes round from the last scene to the first; a loop over part of a scene keeps to that part. Scrubbing and stepping stay within the scene shown, and playback inside a symbol stays in the symbol.
Looping a range
Turn on Loop Playback and drag the ends of the loop range in the ruler to play just part of the timeline over and over, which is ideal for polishing a cycle.
Scripts
Keyframes can carry ActionScript. Write it in the Actions panel (F9) and play it in Test Movie (Ctrl+Enter); both are described in ActionScript and Test Movie.
Frame scripts
Frames can carry scripts, and files made for broadcast often use a few of them to hold a pose or repeat a section. Turn on (Ctrl+Alt+F) and playback follows these calls in the timeline's frame scripts:
stop()- Playback stops on that frame.
play()- Playback carries on, after a
stop()earlier in the same script. gotoAndPlay(10),gotoAndPlay("walk")- Jumps to a frame number (counting from 1, as the ruler does) or to a frame label, and plays on from there.
gotoAndStop(...)- Jumps to the frame or label and stops there.
nextFrame(),prevFrame()- Steps one frame on or back and stops.
The calls can be written with this. in front. A script runs when the playhead arrives at its keyframe, but not the frame you start from, so pressing Enter on a frame with stop() plays on past it. Playback on the stage does not run the scripts: anything else in them is ignored, and so is a call it cannot be sure of, such as one inside an if, a function or a block, one aimed at another clip, or a goto to a computed frame or another scene. Scripts on guide layers are left out. To run a movie's scripts in full, use Test Movie.
The setting is off by default and is remembered. While it is on, movie clips follow the same calls in their own frame scripts, both as they play on the stage during playback and in exported movies, so a clip with stop() on its first frame holds that frame instead of looping.
Test Movie
(Ctrl+Enter) plays the movie in a window of its own as Flash Player would, scripts and all, with buttons that answer clicks and the keyboard. See Test Movie.
Onion skinning
Onion skinning shows nearby frames faintly behind the current one, so you can draw each new drawing in relation to the last. Turn it on with the onion skin button in the timeline header, or (Alt+Shift+O).
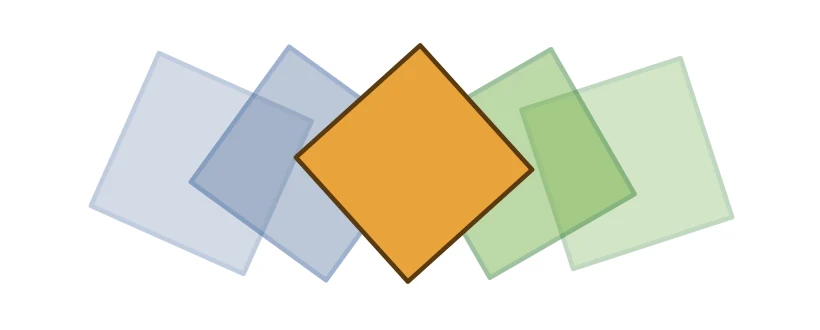
Drag the markers in the ruler to set how many frames are shown, or choose a preset and other options from (also by right-clicking the onion skin button):
- Onion 1, 2, 5, All
- How many frames to show on each side.
- Outline
- Shows the other frames as outlines only.
- Keyframes Only
- Skips held frames and shows only drawings.
- Anchor Onion
- Keeps the onion skin on the frames it covers when you turn this on, instead of moving with the playhead: step through a run of frames and compare each with the same few. Drag the markers in the ruler to change which frames it stays on.
- Opacity
- 25, 45, 65 or 85%.
- Color Before, Color After
- The tints for earlier and later frames.
Locked layers are left out of onion skinning, so lock the background to keep it from cluttering the view.